

On collection day, a row of identical bins along the pavement can make it hard to tell which one is yours. Wheelie bin stickers UK households use, such as a bold house number, a family name or a street name, make your bin easy to recognise and help it find its way back to the right driveway.
This guide covers practical design ideas for personalised bin stickers, which colours work best on common bin colours, where to place your lettering, how to measure the surface and how to prepare the bin so the vinyl adheres properly. If you already know what you want, you can browse the custom bin sticker options at Stickafix.
Why Personalised Bin Stickers Are Worth It
Most UK councils supply bins in a handful of standard colours, so every bin on your road probably looks the same. After the lorry has been, bins are often left in a different spot, and neighbours can easily wheel the wrong one in. A clear house number takes the guesswork out of it.
Bin identification stickers are also useful in these situations:
- Shared driveways and terraces, where several bins sit side by side.
- Flats and HMOs, where flat numbers help residents keep track of their own bins.
- Multiple bins per household, where labels such as "Recycling", "Garden Waste" or "Glass" stop items going in the wrong one.
- Businesses and small shops, where a business name or unit number helps separate trade bins from those of neighbouring premises.
Councils usually own the bins they issue, and some have their own guidance on labelling them. If you're unsure, check your local council's website before adding stickers. In most cases, simple identification such as a house number is what people choose.
Custom Bin Sticker Design Ideas
The best custom bin stickers are simple, bold and readable from the street. Here are some popular ideas.
House numbers
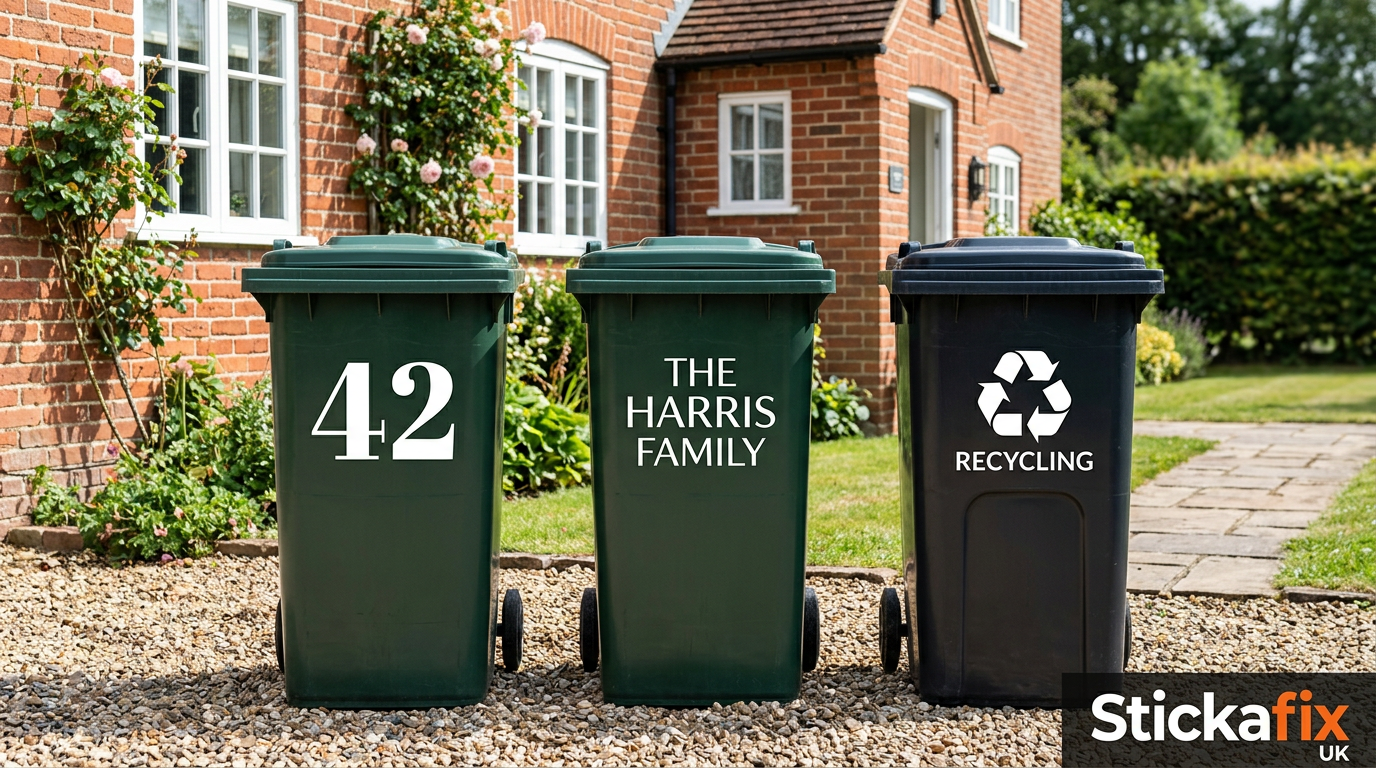
Wheelie bin number stickers are the most practical option. A large, clear number on the front or side is easy to read from a distance and makes the bin identifiable at a glance. Choose a plain, solid font rather than a thin or decorative one, because fine strokes are harder to read from the pavement and can be harder to apply on a bin's surface.
House number and street name
If you live on a long road or near a junction where bins from different streets get mixed up, adding the street name underneath the number helps. Something like "24" in large lettering with "Elm Road" in smaller text below is clear without being cluttered.
House names and family names
Many UK homes have a house name rather than, or as well as, a number. House name decals or a family surname such as "The Patels" add a personal touch while still identifying the bin.
Waste type labels
Words such as "Recycling", "Paper", "Food Waste" or "Garden" help everyone in the household use the right bin, which is useful for visitors, lodgers or children learning what goes where.
A little personality
Some people add a small decorative element alongside the number, such as a simple paw print, leaf or star. Keep any decoration secondary to the number, so the bin still does its main job of being easy to identify.
Choosing Colours for Outdoor Vinyl Bin Stickers
Contrast matters more than anything else. Stickafix bin decals are vinyl-cut, which means the letters and shapes are cut from a single colour of vinyl and there is no background. The colour of the bin itself becomes the background, so the lettering colour needs to stand out clearly against it.
Some general pairings that work well:
- Black, dark grey or dark green bins: white, yellow or silver lettering gives strong contrast.
- Blue bins: white or yellow lettering usually reads well.
- Brown or purple bins: white or yellow tend to be the clearest choices.
- Lighter coloured bins: black or a dark colour is often the most readable.
Avoid colours that are close in tone to the bin, such as dark blue on black or red on brown. They might look fine up close but disappear from the end of the drive. For more help, the guide to choosing decal colours explains how contrast and visibility work.
Where to Place Stickers on a Wheelie Bin
Bins are moulded plastic, and most have a mix of smooth flat panels and textured or ribbed areas. Vinyl adheres best to clean, smooth, flat surfaces, so placement has a big effect on how well your sticker sits.
Front panel
The front of the bin, facing away from the hinges, is usually the most visible spot when the bin is at the kerb. Many bins have a flat area here, which suits house number bin decals well.
Sides
Side panels are a good alternative if the front is heavily textured or already carries council markings. Adding a number to both sides means it can be seen whichever way the bin is left.
Lid
A number on the lid is visible from above, which can help when bins are stored in a row. However, lids are handled constantly and flex every time they open, so the front or sides are generally the better choice for your main sticker.
Areas to avoid
- Heavily textured, ribbed or embossed sections.
- Curved edges and corners where the vinyl would need to bend sharply.
- Over existing council labels, barcodes or tags, which may be needed for collection.
- Areas near the handle or hinges that take a lot of contact.
The guide to placing vinyl decals has more tips on finding the right position on any surface.
Measuring Your Bin Before You Order
Measure first, then choose your sticker size. It's a common mistake to order a number that looks great on screen but doesn't fit the flat area of the bin.
- Find the flat panel where you plan to apply the sticker.
- Measure the width and height of the smooth area only, ignoring textured sections and curved edges.
- Leave a margin of a couple of centimetres on each side so the lettering doesn't run onto a curve or ridge.
- Think about the layout. A single number can be tall, while a number with a street name needs room for two lines.
- Mock it up. Cut a piece of paper to the size you're considering and tape it to the bin, then step back to the pavement to check it reads clearly.
The paper test is surprisingly useful. It shows you straight away whether the lettering is big enough and whether it fits the space. For a more detailed walkthrough, see the guide to measuring for vinyl decals.
Preparing the Surface and Applying Your Bin Sticker
Preparation is the part people tend to skip, but it makes the biggest difference. Bins collect dirt, grease and residue, and any of it left on the surface can stop the adhesive bonding properly.
Cleaning the bin
- Wash the area with warm soapy water to remove dirt and grime.
- Rinse thoroughly to remove any soap residue.
- Wipe the area with isopropyl alcohol to remove remaining grease.
- Let the surface dry completely before applying anything.
Avoid cleaning products that leave a shiny film or contain silicone, as these can interfere with adhesion.
Choosing the right conditions
Apply your sticker on a dry, mild day and avoid applying in cold, damp or wet weather. Vinyl adhesive bonds more reliably when the surface is clean, dry and not too cold. If possible, bring the bin into a garage or sheltered spot while you work.
Applying the decal
Vinyl-cut stickers come with a backing paper underneath and application tape on top, which holds the individual letters in place while you position them. The basic process is:
- Position the sticker and fix the top edge with a strip of masking tape to create a hinge.
- Lift the sticker, peel away the backing paper and lower it slowly onto the surface.
- Press it down firmly from the centre outwards with a squeegee or plastic card to push out air.
- Peel the application tape back slowly at a sharp angle, keeping it close to the surface.
- If any letter lifts with the tape, press it back down and rub over it again before continuing.
Step-by-step instructions are in the guide on how to apply vinyl decals. Once applied, give the adhesive time to settle before washing the bin or putting it out for collection.
Why Vinyl-Cut Lettering Suits Wheelie Bins
Vinyl-cut lettering is a practical choice for bins because there's no background to look out of place. Only the letters and numbers sit on the bin, giving a clean, painted-on look that suits any bin colour.
Other advantages include:
- Clear, crisp shapes that are easy to read from a distance.
- Outdoor vinyl designed for exterior use.
- Custom wording, sizing and colour, so you can design exactly what you need.
- A neater finish than marker pen or paint, without needing artistic skill.
How long any outdoor vinyl sticker lasts depends on factors such as sun exposure, how often the bin is handled or washed, the surface it's applied to and how carefully it was applied. Good preparation and sensible placement give your sticker the best chance of staying neat.
Frequently Asked Questions
What size should wheelie bin number stickers be?
It depends on the flat area available on your bin. Measure the smooth panel, leave a margin around the edges and choose a size that is easy to read from the pavement. A paper mock-up is the easiest way to check.
Can I put stickers on a textured part of the bin?
It's best to avoid it. Vinyl adheres most reliably to smooth, flat, clean surfaces. Textured or ribbed areas reduce contact between the adhesive and the plastic.
Will a bin sticker have a white background?
No. Vinyl-cut stickers are cut from a single colour of vinyl, so only the lettering and shapes transfer to the bin. The bin's colour shows through as the background.
Am I allowed to put stickers on my council bin?
Rules can vary between councils, and the bins are often council property. Check your local council's website if you're unsure, and avoid covering any council labels, barcodes or tags.
Ready to Personalise Your Bin?
A personalised bin sticker is a small, inexpensive way to make collection day easier. Choose a bold, readable design, pick a colour that contrasts strongly with your bin, measure the flat panel and take time to clean the surface before applying. Those few steps make the difference between a sticker that looks tidy and one that looks rushed.
When you're ready, take a look at the range of wheelie bin stickers at Stickafix, or create your own house number, name or label with the online sticker designer.